I finished off with getting both the Intel Edison, Grove Kit, and Ti Launchpad running quite good, but there were some rough edges and more things to discover.
Starting with the Intel Edison: I discovered that the Arduino IDE comes with a huge collection of Intel Edison sample sketches.

I immediately went to WiFi(Edison) > SimpleWebServerWifi. I entered my network info into the sketch and changed the LED from the default 9 to 13 (which is the onboard LED). I tried loading in the IP Address that was printed out in the Serial Monitor, but no connection. I went back to my research and found that the Edison contains an Edison configuration service that uses Port 80. I don’t know the full repercussions, but you’ve got to have some risk in life, and so I disabled that service:
systemctl stop edison_config
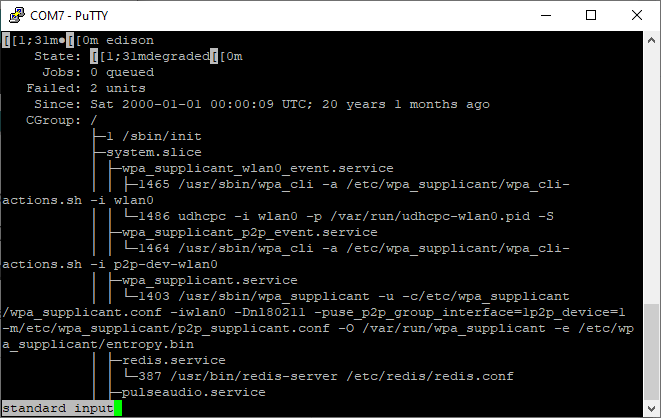
systemctl disable edison_configAnd with that, I discovered that the Intel Edison is powered by systemd, all the way back in 2016 (when this last release was published, though it probably ran systemd since launch in 2014). It isn’t the happiest systemd though, reporting that it is running in a degraded state. The Edison also has PulseAudio, apparently.
So, with that out of the way, I restarted my sketch, and…

… it worked exactly as it should have, with the LED responding to my web server commands. The code for having the Arduino literally run a simple web server on the Edison is shockingly clean, because the Edison actually pretends to be the official Arduino WiFi Shield:
/*
  WiFi Web Server LED Blink

 A simple web server that lets you blink an LED via the web.
 This sketch will print the IP address of your WiFi Shield (once connected)
 to the Serial monitor. From there, you can open that address in a web browser
 to turn on and off the LED on pin 9.

 If the IP address of your shield is yourAddress:
 http://yourAddress/H turns the LED on
 http://yourAddress/L turns it off

 This example is written for a network using WPA encryption. For
 WEP or WPA, change the Wifi.begin() call accordingly.

 Circuit:
 * WiFi shield attached
 * LED attached to pin 9

 created 25 Nov 2012
 by Tom Igoe
 */
#include <SPI.h>
#include <WiFi.h>

char ssid[] = "yourNetwork";      //  your network SSID (name)
char pass[] = "secretPassword";   // your network password
int keyIndex = 0;                 // your network key Index number (needed only for WEP)

int status = WL_IDLE_STATUS;
WiFiServer server(80);

void setup() {
  Serial.begin(9600);      // initialize serial communication
  pinMode(9, OUTPUT);      // set the LED pin mode

  // check for the presence of the shield:
  if (WiFi.status() == WL_NO_SHIELD) {
    Serial.println("WiFi shield not present");
    while(true);        // don't continue
  }

  String fv = WiFi.firmwareVersion();
  if( fv != "1.1.0" )
    Serial.println("Please upgrade the firmware");

  // attempt to connect to Wifi network:
  while ( status != WL_CONNECTED) {
    Serial.print("Attempting to connect to Network named: ");
    Serial.println(ssid);                   // print the network name (SSID);

    // Connect to WPA/WPA2 network. Change this line if using open or WEP network:
    status = WiFi.begin(ssid, pass);
    // wait 10 seconds for connection:
    delay(10000);
  }
  server.begin();                           // start the web server on port 80
  printWifiStatus();                        // you're connected now, so print out the status
}


void loop() {
  WiFiClient client = server.available();   // listen for incoming clients

  if (client) {                             // if you get a client,
    Serial.println("new client");           // print a message out the serial port
    String currentLine = "";                // make a String to hold incoming data from the client
    while (client.connected()) {            // loop while the client's connected
      if (client.available()) {             // if there's bytes to read from the client,
        char c = client.read();             // read a byte, then
        Serial.write(c);                    // print it out the serial monitor
        if (c == '\n') {                    // if the byte is a newline character

          // if the current line is blank, you got two newline characters in a row.
          // that's the end of the client HTTP request, so send a response:
          if (currentLine.length() == 0) {
            // HTTP headers always start with a response code (e.g. HTTP/1.1 200 OK)
            // and a content-type so the client knows what's coming, then a blank line:
            client.println("HTTP/1.1 200 OK");
            client.println("Content-type:text/html");
            client.println();

            // the content of the HTTP response follows the header:
            client.print("Click <a href=\"/H\">here</a> turn the LED on pin 9 on<br>");
            client.print("Click <a href=\"/L\">here</a> turn the LED on pin 9 off<br>");

            // The HTTP response ends with another blank line:
            client.println();
            // break out of the while loop:
            break;
          }
          else {      // if you got a newline, then clear currentLine:
            currentLine = "";
          }
        }
        else if (c != '\r') {    // if you got anything else but a carriage return character,
          currentLine += c;      // add it to the end of the currentLine
        }

        // Check to see if the client request was "GET /H" or "GET /L":
        if (currentLine.endsWith("GET /H")) {
          digitalWrite(9, HIGH);               // GET /H turns the LED on
        }
        if (currentLine.endsWith("GET /L")) {
          digitalWrite(9, LOW);                // GET /L turns the LED off
        }
      }
    }
    // close the connection:
    client.stop();
    Serial.println("client disonnected");
  }
}

void printWifiStatus() {
  // print the SSID of the network you're attached to:
  Serial.print("SSID: ");
  Serial.println(WiFi.SSID());

  // print your WiFi shield's IP address:
  IPAddress ip = WiFi.localIP();
  Serial.print("IP Address: ");
  Serial.println(ip);

  // print the received signal strength:
  long rssi = WiFi.RSSI();
  Serial.print("signal strength (RSSI):");
  Serial.print(rssi);
  Serial.println(" dBm");
  // print where to go in a browser:
  Serial.print("To see this page in action, open a browser to http://");
  Serial.println(ip);
}
Now for the second issue I’ve noticed when using the Edison. Let’s say you have automatic starting of the sketch (from Part 1) turned on. If you edit your sketch on the Arduino IDE and start it, the old auto-started sketch and the new sketch will end up running simultaneously, which will make things quite… interesting, but not exactly fun.
I haven’t figured out an elegant fix for this, but my solution so far is to use the Linux top command to find the process ID of the auto-started sketch, and then kill that process before uploading new code.
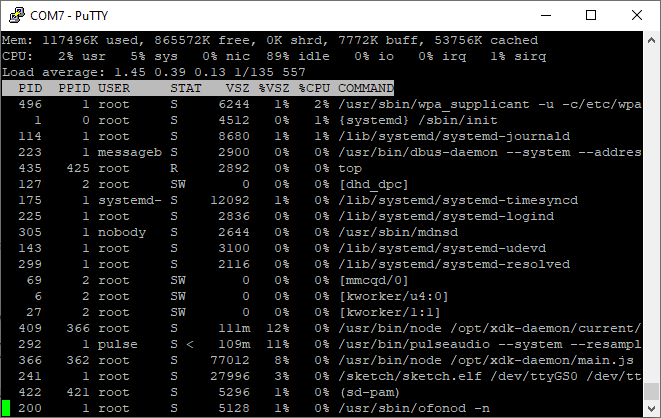
In this window, the sketch is process 241. I then just run kill 241 or whatever number in the command prompt to stop the auto-started sketch. I only need to do this when I plug in the Edison after a reboot to upload new code with the IDE. Maybe there’s something I’m missing?
This brings me to my biggest discovery. The Yocto Poky image for the Edison is old. 2016 old. Linux 3.10 old. Some engineers have created an auto-building branch system for much more up-to-date, unofficial images for the Edison at https://github.com/edison-fw/meta-intel-edison and https://edison-fw.github.io/meta-intel-edison/ . These images are, well, unofficial, not necessarily reliable, may break things between releases, and you have to build them yourself on a Linux machine or VM. However, considering the speedily disappearing information about the official release and the fact that the new firmware is 4 years newer, I can put up with that, but I don’t have a Linux dual-boot system at the moment, so I’m going to put that on hold for things to try someday. You may feel differently.
I then looked at the 3D Magnetic Sensor, TLE493D A2B6. Apparently, it has a Cortex M0 processor which could be theoretically programmed, but I don’t really know how this can be done, and the programming language would probably be quite difficult. This sensor works by measuring magnetic force in all three cardinal directions from a small, nearby object (the very small magnetic cube that comes in the box). There’s a neat 3D printed demo of this with a GUI for Windows to demonstrate this:
Neat as that is, I don’t really feel like 3D printing the parts for that demo, even though I have a Original Prusa Mini on the desk. It just doesn’t seem like the best use of plastic. Instead, I got digging and on page 27 of 30 on the sensor datasheet is the link to an Arduino library. I really don’t have any uses for the sensor at this time, but just knowing how to attach it to the Arduino or the Edison greatly improves my odds of using it in the future. (I’m noticing a pattern about how almost all of the equipment I’ve gotten in these boxes can be connected or turned into an Arduino one way or another.) They say that the sensor doesn’t work in “low-power mode” with that library, but I’m looking at the sensor and wondering how much power it would normally draw, especially considering it’s running on regular USB. The library also has convenient links to the datasheets and other sensor information.
In other news, it took a while, but I finally found the MOSFET datasheet. The model is IPT60R028G7. I initially didn’t know what to do with this device, but was stunned to see that it cost $15.80 each on Digi-key, so this was no average MOSFET. I contacted Hackster.io’s Jessica Tangeman to ask what it was for, and it turns out it is a very powerful MOSFET. She sent me a link to all of the amazing projects that could be built with it, and also mentioned some reasoning behind the part selection:
Check out some other projects with the MOSFET – it’s incredibly powerful. https://www.hackster.io/infineon/products/coolmos-c7-gold-sj-mosfet
And yes, it’s the old Intel Edison. They don’t sell them anymore and there are a lot of hardware collector fanatics out there so once the hardware boxes hit the $ value mark, we decided to throw in some extra things for fun.
https://www.hackster.io/contests/SecureEverything/discussion/posts/6448#comment-125080
And, there you have it. I’m still figuring out what I’ll probably build with it, but for now I’m keeping that MOSFET safe and don’t want to lose it!
Leave a comment